4. Hideout Phase
Hideout Menu
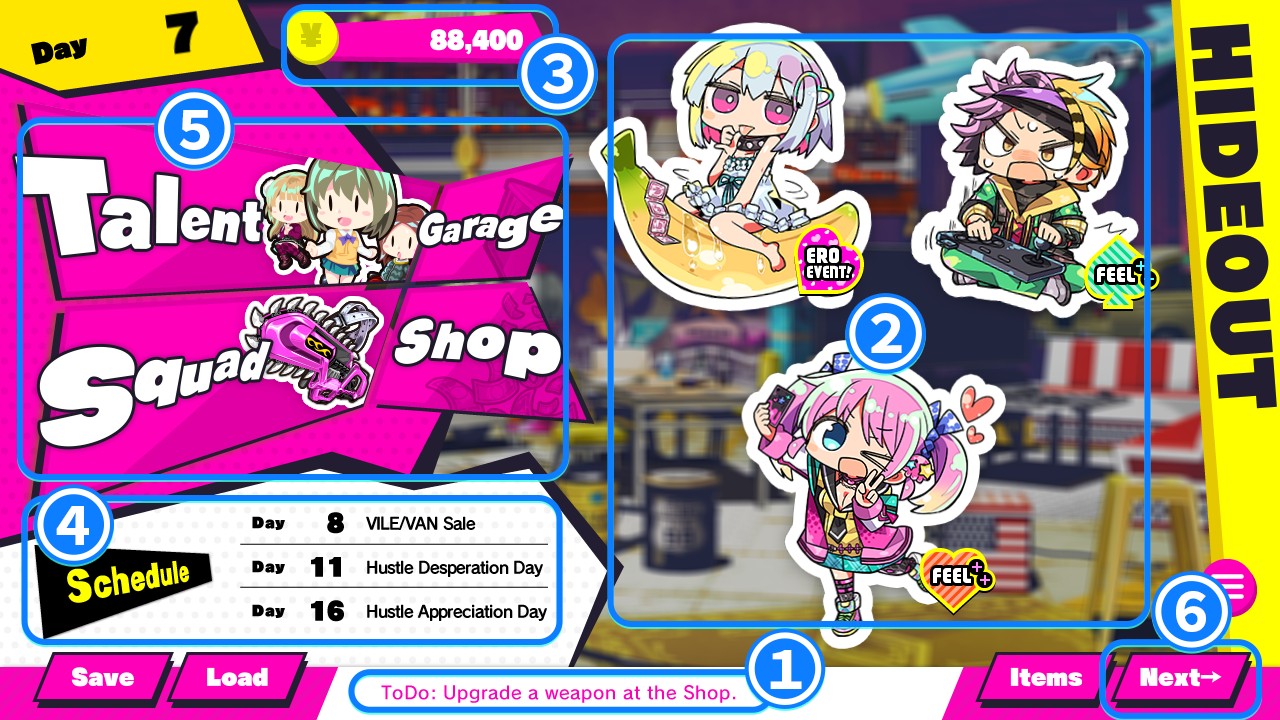
1. ToDos and Tips
"ToDos" must be completed to proceed with the game's main story.
"Tips" are hints about the game's systems.
You can mouse over the area where these are displayed to force your current ToDo to appear.
2. Palling Around
Every day, you can choose one of your squad members to hang out with.

Increase the Feeling (affection) of the squad member.
More plus signs means more Feeling.

Receive an item from the squad member.

See a special event scene with the squad member.
These become available based on Feeling Level and game progression.
3. Money
The funds you need to make purchases at the shop.
You can get more by Hustling.
4. Schedule
Shows upcoming events and plans.
Hustle Appreciation Day
It's just after payday for many clients, so they arrive with pockets full of cash.
Hustle Desperation Day
A day when many clients have been worn down by life.
They're eager to pay, but they tend to mistreat and damage the talent.
VILE/VAN Sale
A day when the shop discounts many items to clear out old stock.
Dona-Dona Day
On this day, a hotspot appears at some location. Hunting there may let you dona-dona talent with high stats.
Matching Deadline
This is the date by which you must match a talent to the current order from a VIP.
5. Hideout Menu Buttons
From this menu, you can prepare talent for Hustling or your squad for Hunting.
⇒ Talent
⇒ Squad
6. Next
Ends the Hideout Phase.
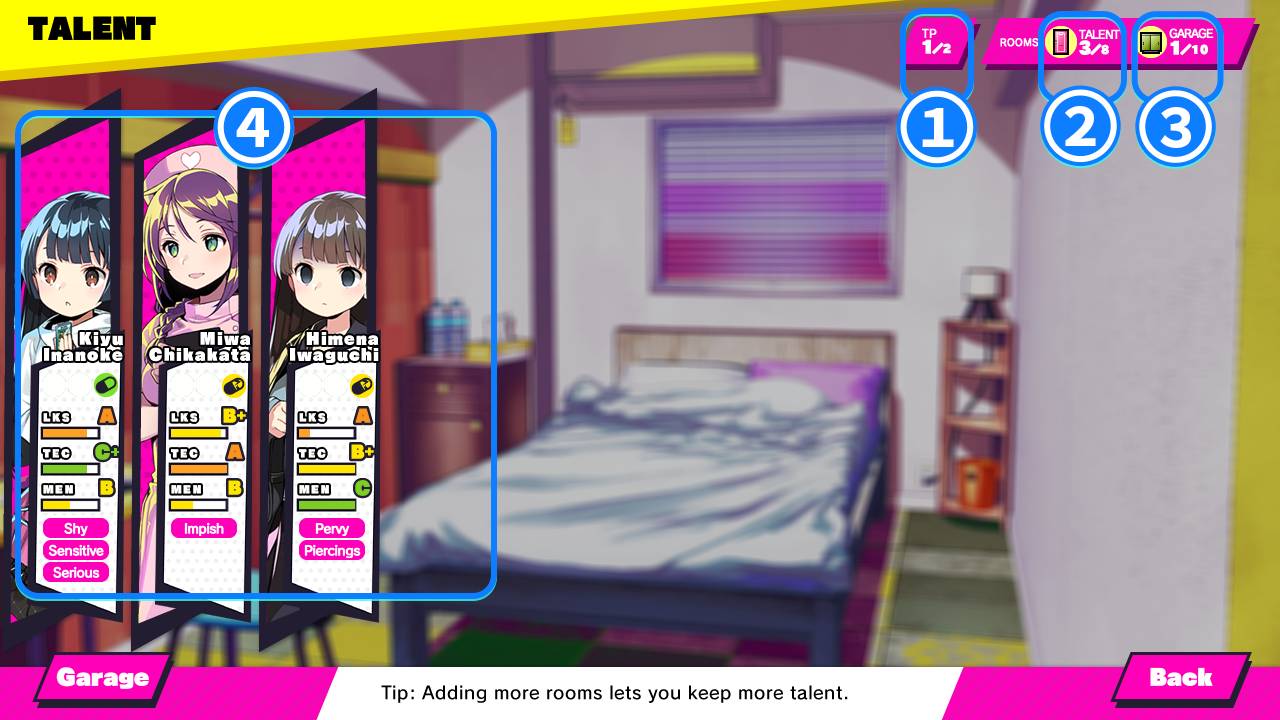
Talent
1. TP (Training Points)
Spend these points to carry out Training.
They recover fully every day.
2. Talent/Rooms
The number of rooms you have, and the number of talents occupying them.
You can purchase expansions from the shop as Fixtures.
3. Talent/Garage
The number of talents currently occupying the Garage.
4. Talent
Choose a talent to see her detailed status.
You can also drag and drop to rearrange.
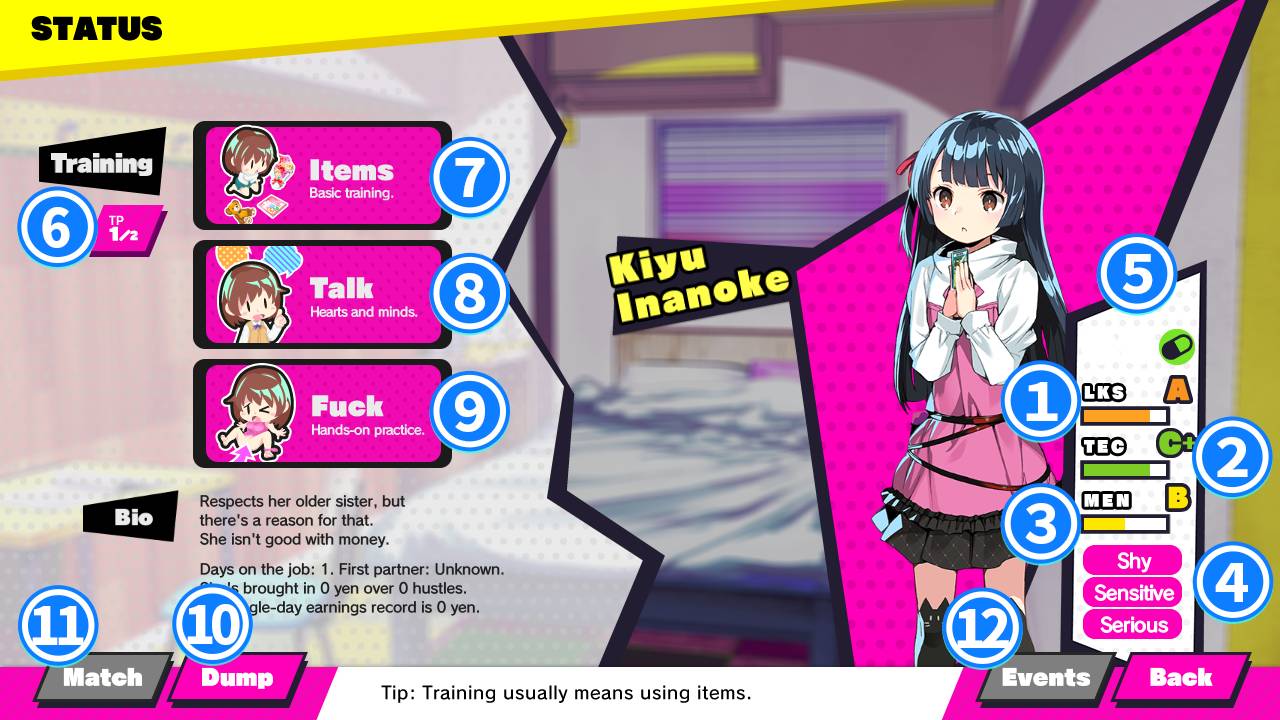
Talent Status
1. Looks (LKS)
Measures the talent's attractiveness.
Clients use this metric to choose between stores.
Hustling decreases this stat.
2. Technique (TEC)
Measures the talent's skill and dexterity.
A higher value here will result in higher income.
Hustling increases this stat.
3. Mentality (MEN)
Measures the strength of the talent's spirit.
Hustling decreases this stat.
When it reaches 0, the talent will snap.
(Her status panel will turn dark red and an icon will appear to indicate this.)
Broken talent will not make much money.
This condition is irreversible.
4. Traits
Special qualities possessed by a talent will affect her stats.
Click on them to see the details.
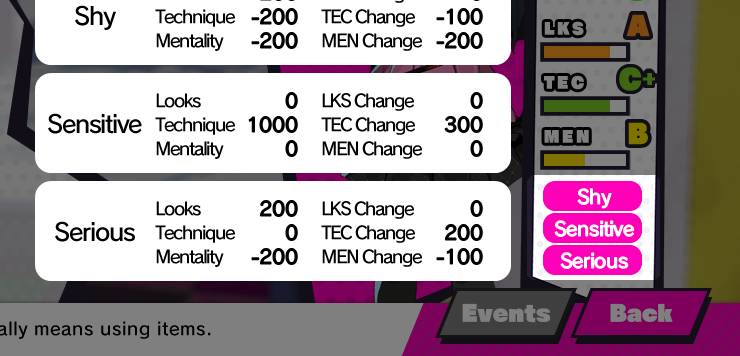
Looks, Technique, and Mentality
These values affect the talent's stats directly.
For example, if Looks is 200 here, then that value has been added to the talent's stats.
Looks, Technique, and Mentality Change
These values are added on to the change value of the talent's stats after each hustling.
5. Condition
Displays the current state of the talent.
Click to view details.

Indicates the effects of the pill (DEF).
It is possible to become pregnant in any state other than green (safe).
Hustling decreases this value.
Using pill items in Training will increase it.

Indicates no experience with sexual intercourse.
Hustling in this state can make a lot of money.

Indicates a state of pregnancy.
(The status panel itself will also turn purple.)
Hustling in this state will worsen the effect on stats.
This condition is irreversible.

Indicates a mentally broken state.
(The status panel itself will also turn red.)
Money made in this state will be greatly decreased.
This condition is irreversible.
6. TP (Training Points)
Points needed for all types of training.
TP recovers fully at the start of every day.
7. Item
Train the talent through the use of items.
Consumes 1 TP.
You can increase the talent's stats.
8. Talk
Train the talent through conversation.
Consumes 1 TP.
Slightly increases the talent's stats.
9. Fuck
Train the talent through penetration.
Consumes 1 TP.
This will not cause pregnancy.
10. Dump
Dump the talent.
After you dump a talent, she'll disappear from her room. You will never see her again.
11. Match
You can check the current matching criteria, or choose this talent to match with the VIP.
Talent sent out on a Match order will not return until the Matching Deadline.
12. Events
Check the conditions under which you can view event scenes for unique heroines.
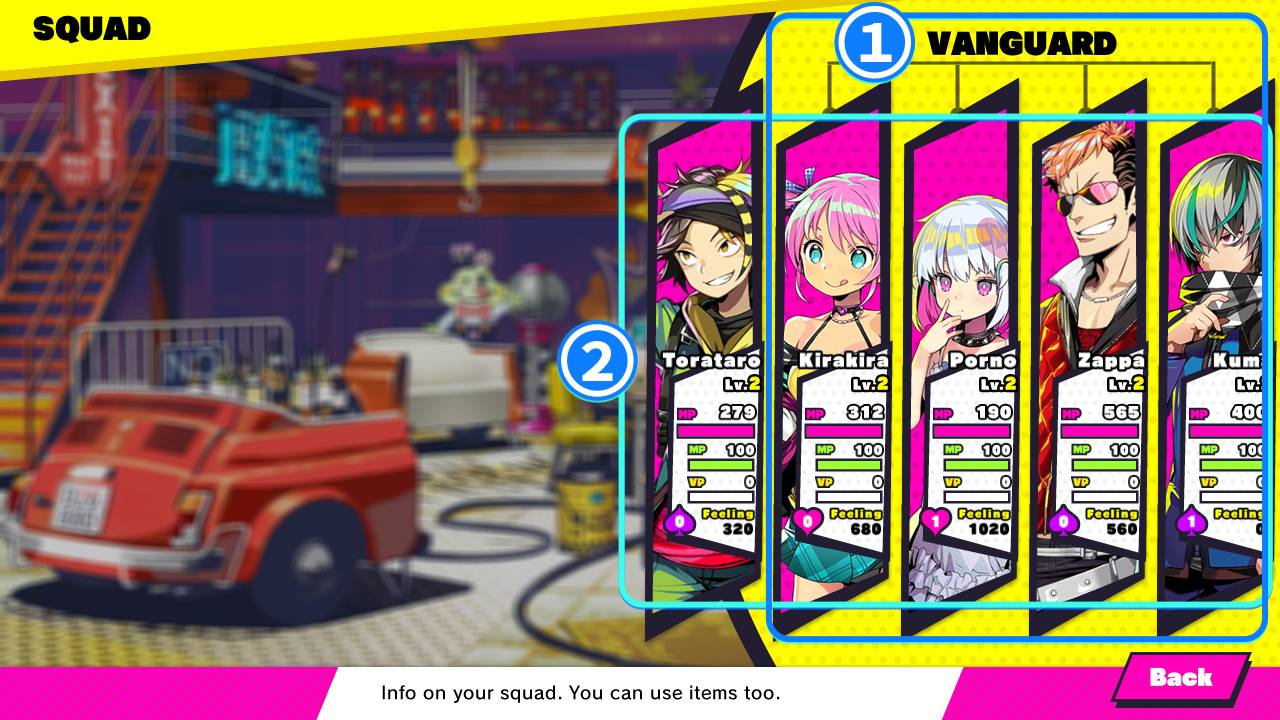
Squad
1. Vanguard
These members will start on the frontlines of combat.
The right-hand side is closest to the enemy.
2. Members
Select a squad member to see their detailed status.
You can also drag and drop to rearrange.
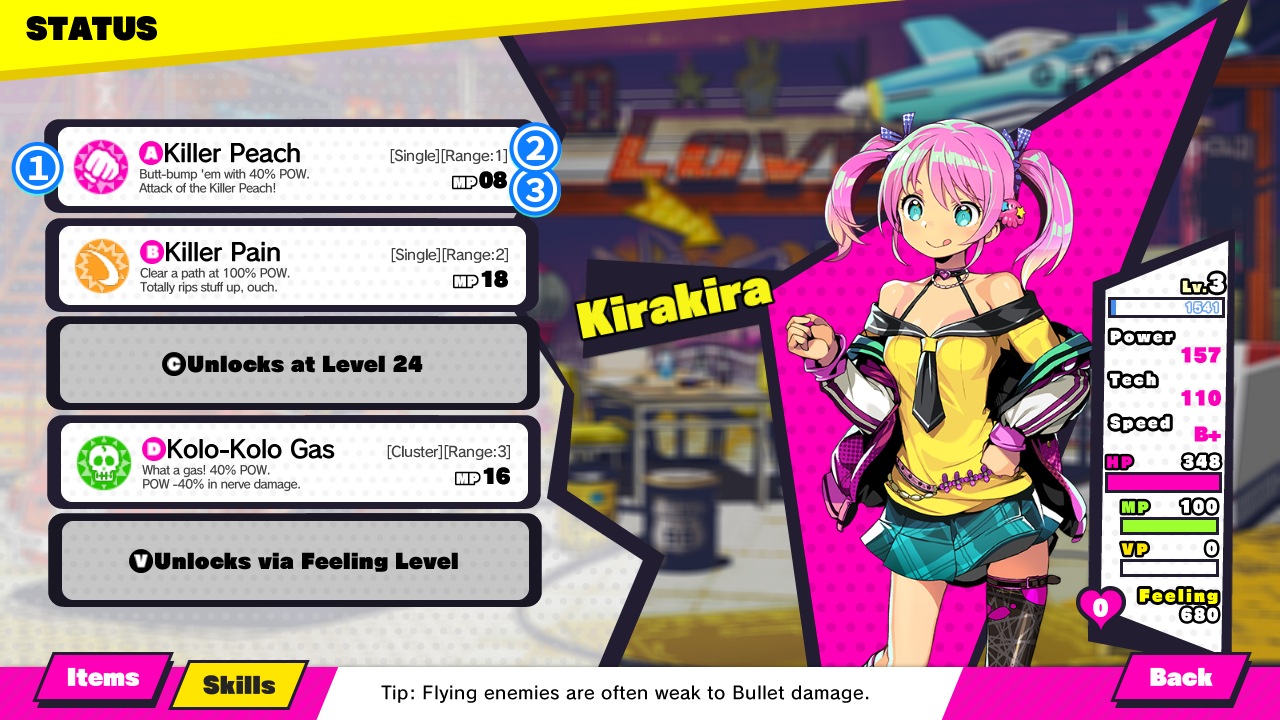
Squad Status

1. Level
2. EXP to Level Up
3. Power (POW)
Affects the damage done by Active Skills.
Can be increased by gaining levels or upgrading weapons.
4. Technique (TEC)
Affects critical hits, the success of skill debuff effects, and Lazy Skills.
Also affects the chance of getting a Speed Boost when battle begins.
Can be increased by gaining levels or upgrading weapons.
5. Speed (SPD)
Affects turn order.
Can be increased by equipping the Skip badge.
6. HP (Health Points)
If a squad member's HP reaches 0, they will have to retreat.
Use HP healing items (spicy foods) to avoid that situation.
7. MP (Move Points)
Expended to use Active Skills.
Use MP healing items (fizzy drinks) to recover MP.
When MP is below 0, you can still use Active Skills, but you will incur the following penalties.
From 0 to -40%: Speed greatly reduced.
From -40% to -70%: Technique and Speed greatly reduced.
From -70% to -100%: Power, Technique, and Speed greatly reduced.
8. VP (Voltage Points)
When VP is over 100, the power of some Active Skills will increase.
You can also expend 100 VP to use a powerful Voltage Skill.
(As long as the character's Voltage Skill is unlocked.)
VP increases when taking or inflicting damage
and can also be gained with VP healing items (sweets).
9. Feeling
The squad member's Feeling (affection) towards Kuma.
When this exceeds a certain value, and when the progress of the main story permits,
a special event will appear. Viewing it will increase Feeling Level.
Feeling Items can raise Feeling significantly, while smaller increases can be achieved
by palling around from the Hideout menu or through Kuma's Lazy Skill.
10. Feeling Level
10 is the maximum. Increases in Feeling Level bring bonuses to various parameters,
and the higher the level, the more likely that character is to assist Kuma's Active Skill "Point Blank".
Feeling Level also affects the game's ending.
Kuma's own Feeling Level is the highest Feeling Level from among your squad.
11. Badge
Equip badges that you found in dungeons.
Slots are unlocked via Feeling Level.
12. Lazy Skills
Passive skills that activate automatically, usually in battle.
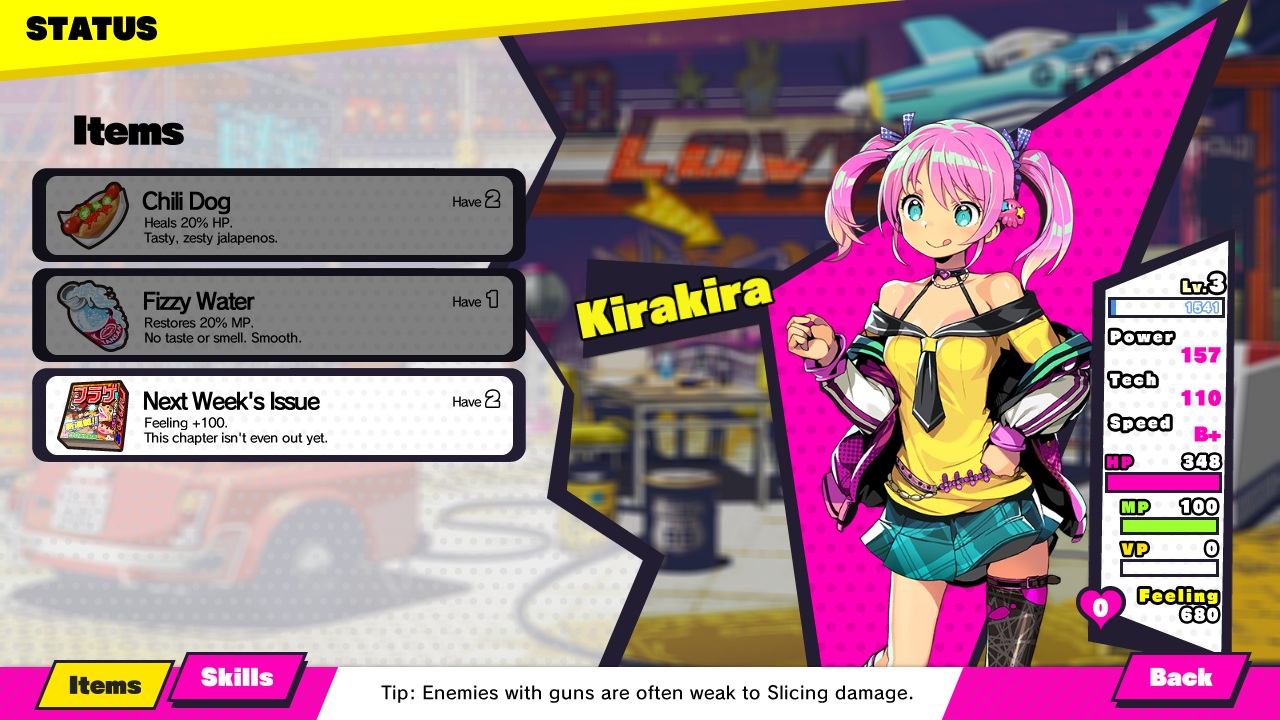
Squad Status (Items)
You can use items to heal or increase the Feeling of squad members.
Squad Status (Skills)
1. Damage Types
 BashingUsually does neutral damage.
 SlicingUsually strong against foes with guns.
 BulletUsually strong against flying foes.
 BurnUsually strong against flammable foes.
 ShockUsually strong against mechanical foes.
 PoisonUsually weak against mechanical foes.
2. Ranges
SingleAffects one target.
NeighborAffects one target and its adjacent allies.
AllAffects all foes (or all allies).
AllFrontAffects multiple allies in front of the user.
AllBackAffects multiple allies behind the user.
3. MP
Consumed every time you use an Active Skill.
⇒ MP (Move Points)